
Бронцолор Сирос 800 С ВиФи / РФС 2 Упутство за употребу
Следећа упутства за употребу Бронцолор Сирос 800 С су репродукција званичних материјала произвођача за брзу референцу од стране
За техничке информације о хардверским компонентама, софтверским алатима, принципима режима и препорученим поставкама за Бронцолор светла са
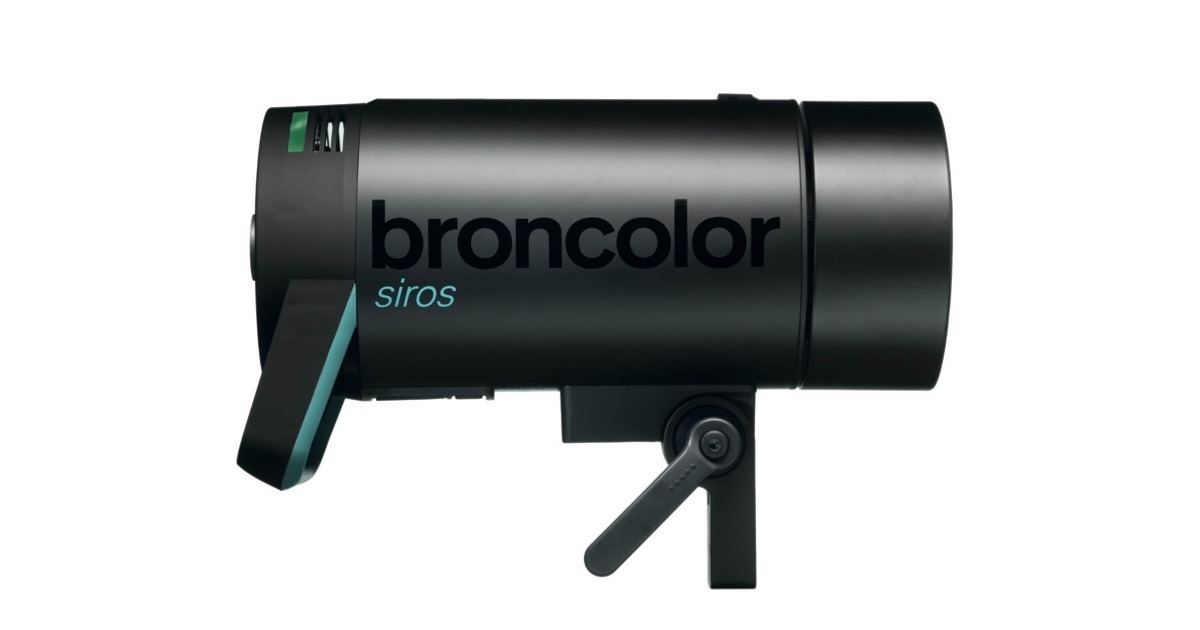
Напомена: Ова упутства за употребу представљају репродукцију званичних упутстава за употребу произвођача за студијска светла Бронцолор Сирос 8 С серије. Погледајте веб страницу произвођача бронцолор.свисс за оригиналну документацију о вашем конкретном производу. Истовремено , обавезно се придржавајте свих упутстава која су посебно приложена вашем уређају пре његове прве употребе.
Контроле и дисплеји
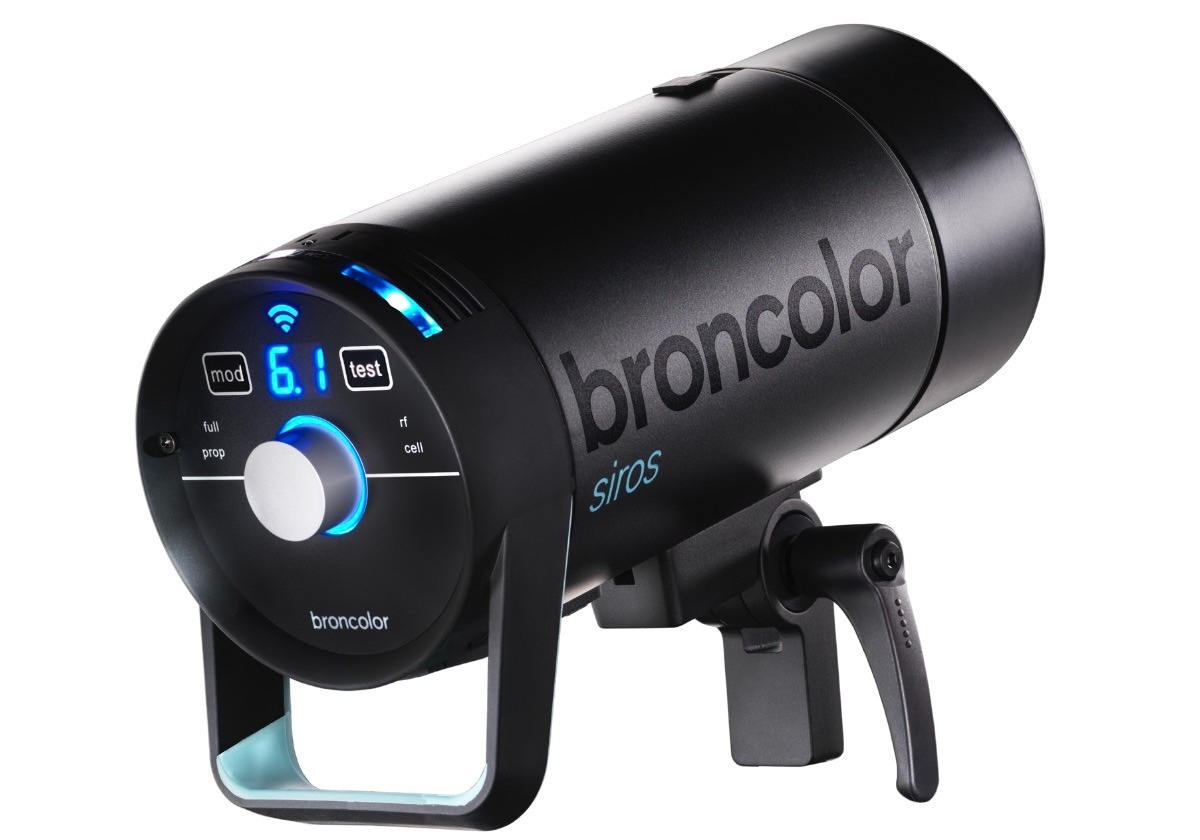
Контроле и дисплеји за Бронцолор Сирос 800 С су следећи.
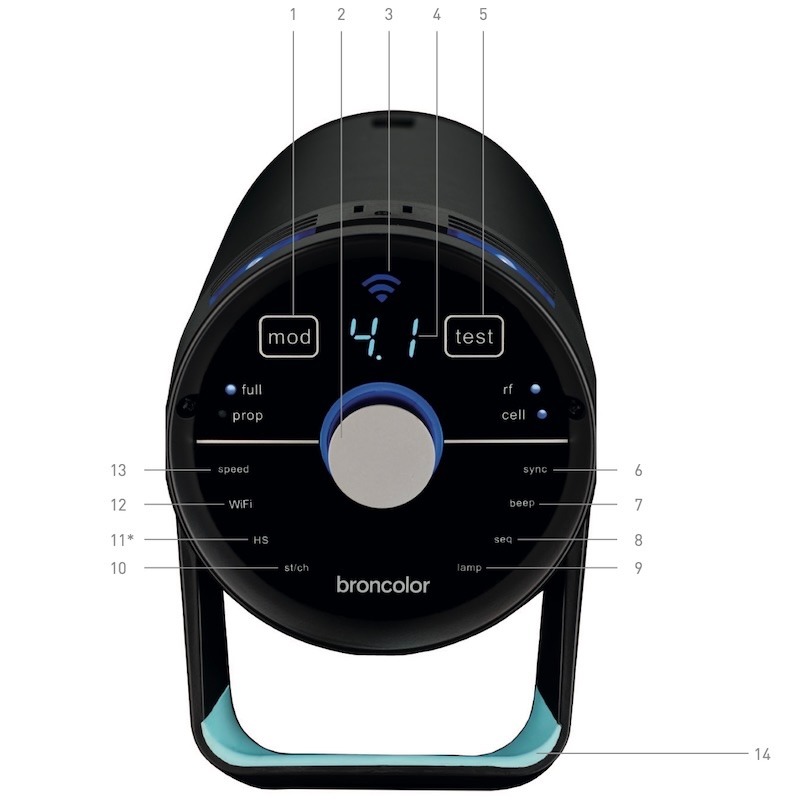
- Моделирање светла за укључивање / искључивање
- Ротари контролер
- Ви -Фи дисплеј
- Дигитални Дистрибуција електричне енергије дисплеј
- "Тест " тастер
- Подешавања менија
- Подешавања менија
- Подешавања менија
- Подешавања менија
- Подешавања менија
- Подешавања менија
- Подешавања менија
- Подешавања менија
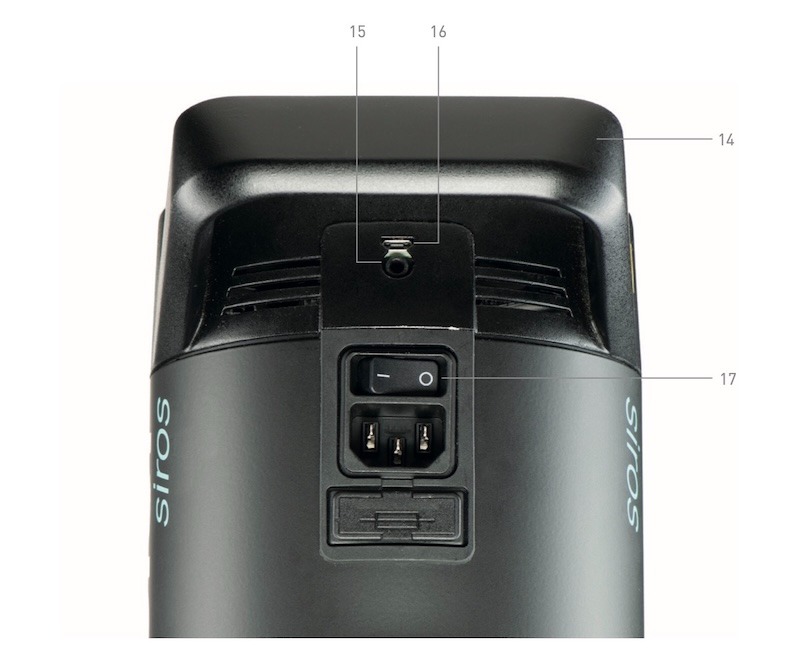
- Ručka
- Sinhro utičnica
- Мини УСБ
- Мрежни прекидач
Пре употребе
Бронцолор Сирос С је висококвалитетни производ који пружа године радног стажа ако се правилно користи. Обавезно пажљиво прочитајте све информације у овим упутствима за употребу, која такође садрже важна упутства за употребу и одржавање уређаја. Упутите даље кориснике на ова упутства како бисте упознали нове кориснике са уређајем, његовом употребом и одржавањем. Поред тога, увек се придржавајте безбедносних упутстава која се налазе одвојено за ваш уређај из Бронцолор-а.
Садржај
- Обим снабдевања
- Прво покретање
- Контролни елементи
- Преглед функција&нбсп;главног менија
- Навигација менија
- Контролисање Фласх Тимес
- Претрага
- ХС Функција
- Посебне функције
- Информације и поруке о грешкама
- Питања и одговори
- Прибор
- Одржавање / поправке
- Информације о заштити животне средине
- Гаранција и обавештење за купце из Велике Британије
- Технички подаци
1 . Обим снабдевања
1.1. Сирос 800 С WиФи / РФС 2 – 31.643.XX
Прво , уверите се да сте примили следеће ставке у испоруци.
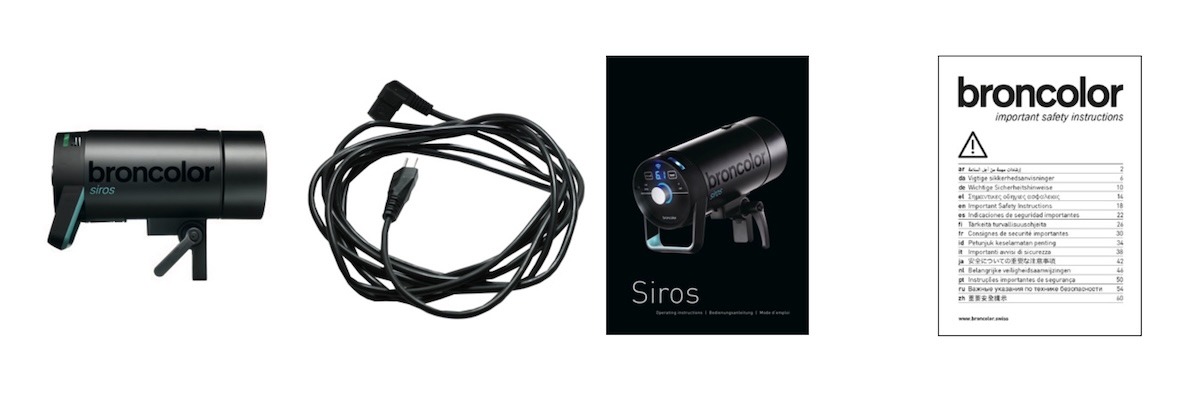
- Сирос С Монолигхт&нбсп;
- Мрежни кабл&нбсп;
- Упутство за употребу (BA109.00)
- Важна упутства о безбедности (ВА-18-1)
1 .2 . Комплети
Садржај Сирос Екперт Кит-а укључује:
- 2 × Сирос 800 С ВиФи / РФС 2
- 1 × Кишобран, 85 цм (33.574.00)
- 1 × Софтбоx 60 x 60 (33.561.00)
- 1 × Брзина Прстен (33.401.00)
- 2 × Јуниор Станд АЦ (35.100.00)
- 1 × Фласх Торба 2 (36.532.00)
- 1 × Додатна торба (36.535.00)
- 1 × Синхронизација кабл (34.111.00)
Садржај Сирос Про Кит-а укључује:
- 3 × Сирос 800 С WиФи / РФС 2
- 1 × Софтбоx 60 x 60 (33.561.00)
- 1 × Октабокс 75 (33.600.00)
- 2 × Брзина Прстен (33.401.00)
- 2 × L40 Стандард Рефлектор (33.115.00)
- 3 × Јуниор Станд АЦ (35.100.00)
- 1 × Фласх Торба 3 (36.533.00)
- 1 × Додатна торба (36.535.00)
- 1 × Синхронизација кабл (34.111.00)
2 . Прво покретање
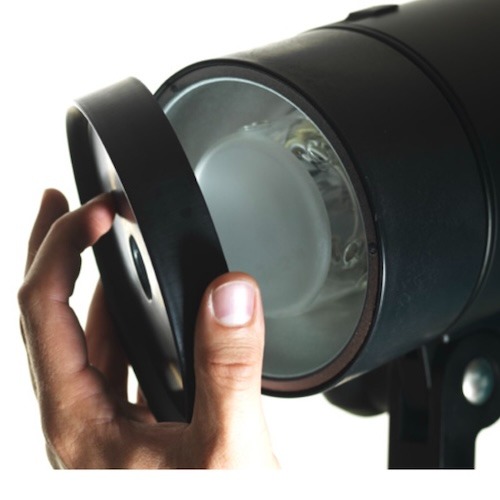
2 .1 . Уклоните заштитни поклопац
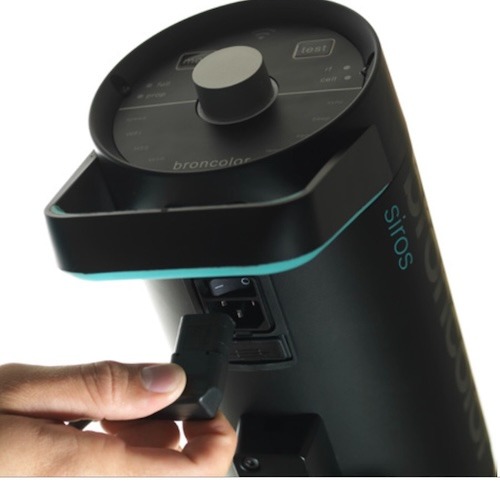
2.2 . Укључите мрежни кабл
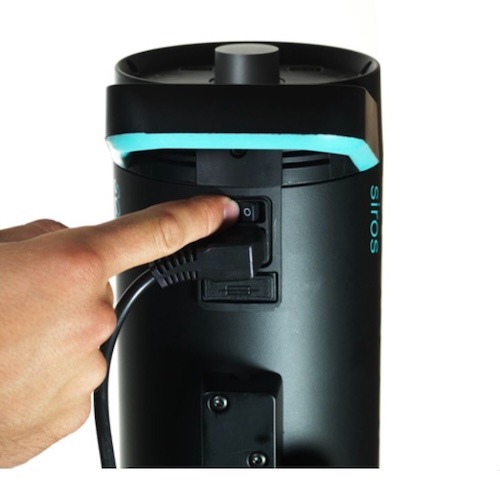
2 .3 . Укључите јединицу на главном прекидачу
3 . Контролни елементи
3 .1 . Функције елемената
Ротациони контролер (2)

- Ротациони контролер (2) функционише за укључивање и искључивање уређаја (станд-би моде). Притиском на ротациони контролер за 3 секунде пребацује уређај у стање приправности.
- У менију, ротациони контролер омогућава навигацију менија и потврду ставки менија. Постоји даље објашњење навигације менија у поглављу 5.
- У раду, ротациони контролер мења енергију блица. Окретање у смеру супротном од казаљке на сату смањује енергију блица, док је окретање у смеру казаљке на сату повећава. У међувремену, окретање контролера полако га мења у 1/10 ф-стоп корацима, и окретање брзо ("увијање") у 1/1 ф-стоп корацима.
Инфо дисплеј (4)
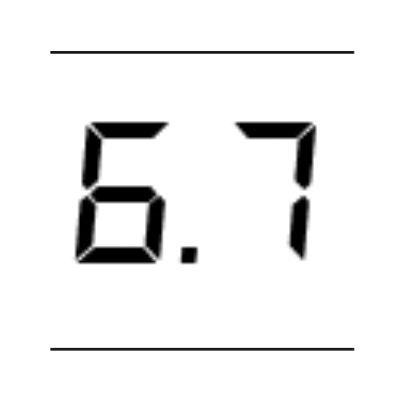
- Инфо дисплеј (4) приказује изабрану енергију блица или опције избора менија.
Мод - Моделирање светла за укључивање / искључивање (КСНУМКС)

- Користите " мод " (1) за укључивање или искључивање светла за моделирање. Дужим притиском на дугме мења се режим рада из "пуног" у "проп" или обрнуто.
Тест (5)

- Коришћење "теста" (5) ће започети тест. Екран "Реади" око ротационог контролера мења се у плаву чим се заврши операција пуњења / пражњења.
3 .2 . Функције менија
Брзина (13) НајдужеНајновије

- Подешавање менија "брзина" (13) је за брзо пуњење и време блица. Додатно објашњење пронађите у поглављу 6 ових упутстава за употребу.
WиФи (12)
- "ВиФи " (12) означава да ли је ВиФи укључен или искључен.
HS (11)

- "ХС " означава да ли је ХС укључен или искључен.
Студио / канал (10)
- Подешавање менија "ст /цх" (10) је за промену студио / канал. Користите га за пребацивање тренутног студијског канала (РФС 2).
Лампа (9)

- Користите лампицу за подешавање менија (9) да бисте изабрали канал лампе (РФС 2).
Редослед (8)

- Поставка менија "сек" (8) бира број бљескова.
Звучни сигнал (7)

- Функција менија "бип" (7) показује да ли је акустично упозорење "Реади" укључено или искључено.
Синхронизација (6)
- Коришћење "синхронизације" (6) дозвољава избор различитих метода ослобађања (фотоћелија, радио, фотоћелија и / или радио).
Синхронизација утичница / мини УСБ (15 / 16)

- Користите функције менија Синц утичница / Мини УСБ (15 / 16) за ослобађање преко синхронизационог кабла или ажурирање софтвера преко мини УСБ-а.
Укључивање / искључивање (17)

- Користите укључивање / искључивање (17) на уређају да бисте га укључили или искључили.
4 . Преглед главних функција
Главне функције су следеће.
- Да бисте ушли у главни мени, притисните ротациони контролер (2).
- Окрените ротациони контролер (2) у смеру казаљке на сату или супротно од казаљке на сату да бисте дошли до жељене ставке менија.
- Да бисте потврдили свој избор, поново притисните ротациони контролер (2). Изабрана ставка менија почиње да трепери.
5 . Навигација менија
Функције менија Бронцолор Сирос 800 С укључују:
- садржина
- Ви -Фи Фи
- HS
- st/ch
- садржина
- садржина
- звучни сигнал
- синхронизација
Након притиска на ротациони контролер (КСНУМКС), улазите у главни мени монолигхта. Одатле имате приступ различитим функцијама.
Имајте на уму: Ако ставка менија не може да се изабере, као што је са производима који нису Сирос 800 С, јединица не подржава ту функцију.
Пример: Подесите низ од 15 бљескова по издању.
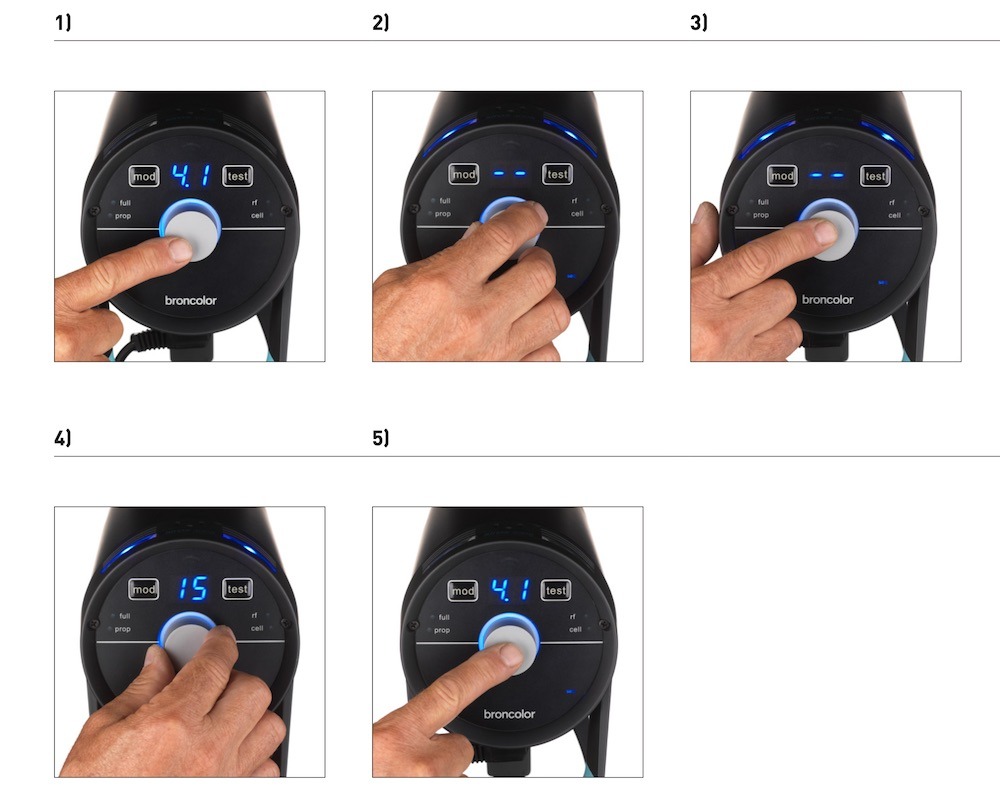
- Притисните ротациони контролер (2) да бисте ушли у главни мени. Последња изабрана ставка менија ће бити приказана. Главни екран се мења од приказивања излазне снаге на изабрану ставку менија.
- Окрените ротациони контролер (2) док не дођете до ставке менија "сек".
- Притисните ротациони контролер (2) да бисте потврдили ову функцију. Екран "сек" почиње да трепери.
- Окрените ротациони контролер (2) док се на главном дисплеју не појави "15".
- Потврдите овај избор притиском на ротациони контролер (2). Након ове потврде, уређај се пребацује у нормално стање. Ако се избор не потврди у року од 5 секунди, уређај се пребацује у нормално стање без промене подешавања.
6 . Контролисање времена блица
У главном менију можете подесити време бљескалице монолигхта на "брзину". Ова поставка израчунава најбрже могуће време бљеска за изабрани ниво енергије. Ово такође може довести до тога да се боја блица благо помери према плавом региону.
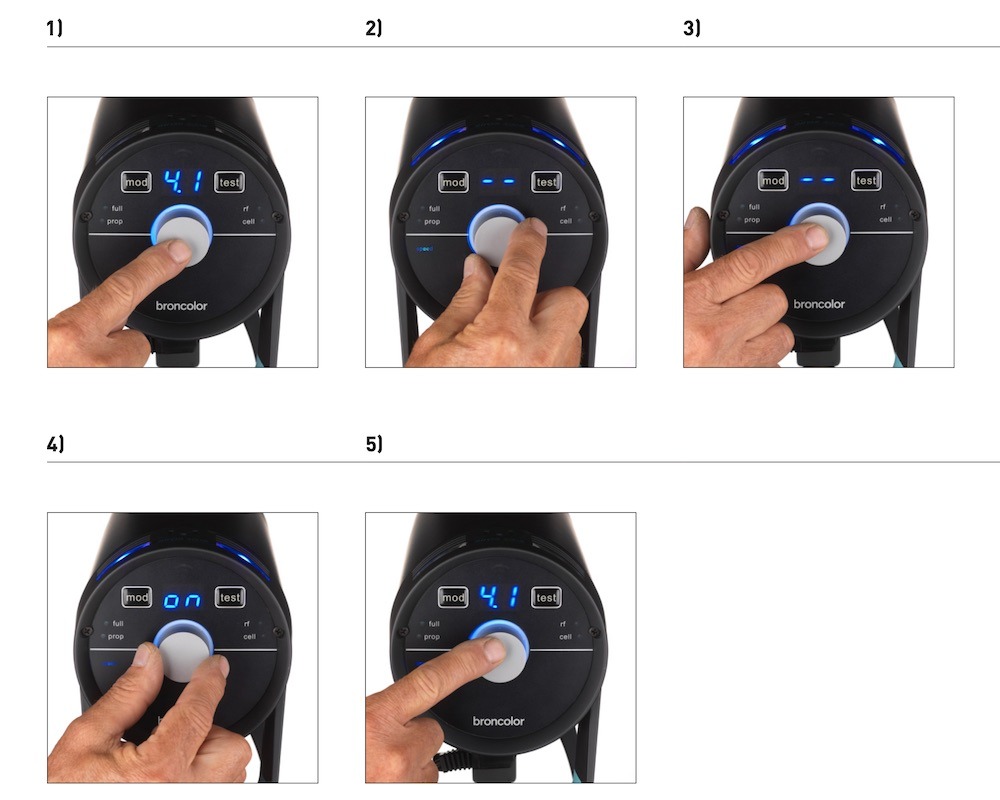
- Притисните ротациони контролер (2) да бисте ушли у главни мени.
- Окрените ротациони контролер (2) док не дођете до ставке менија"брзина".
- Потврдите овај избор притиском на ротациони контролер (2).
- Користите ротациони контролер (2) да бисте изабрали опцију "он" или "офф".
- Потврдите ово са ротационим контролером (2).
7 . Ослобађање
7 .1 . РФС 2 модул (радиофреквентни систем)
За РФС 2 контролу блица, канал (студијска адреса) мора одговарати каналу предајника. Адреса студија је постављена у менију на позицији "ст". Канал лампе је дефинисан у менију под "лампа". Погледајте одељак 9.3 за више информација о промени боја когнитивних светла.
Помоћу радио примопредајника можете дефинисати и подесити појединачне лампе по жељи. Да бисте сазнали како да то урадите, погледајте упутства за употребу примопредајника. Примопредајник није стандардно укључен у појединачне главе.
7 .2 . Фотоћелија (ћелија)
Фотоћелија се може укључити и искључити помоћу функције менија"синхронизација" (6). Када је ово активно, плава ЛЕД диода поред ознаке "ћелија" светли. Након првог бљеска секвенце, активна фотоћелија се деактивира, а плава ЛЕД диода поред тастера"синхронизација" (6) трепери. Притиском на тастер "тест" поново га укључује.
7 .3 . Синхронизација утичница (15)
Синхронизациони каблови – 5m (16.4ft) (чл. Бр . 34.111.00) и 10m (32.8ft) (34.112.00) – могу се монтирати на утичницу за отпуштање кабла (15).
7 .4 . "тест" кључ (5)
Користећи овај тастер, монолигхт се може покренути ручно. Бљесак се може активирати чим се достигне 70% подешеног нивоа енергије. Визуелни индикатор "Реади", с друге стране, светли само када се постигне 100%.
8 . ХС функција
У комбинацији са РФС 2.2 предајником, можете користити Сирос 800 С монолигхт са изузетно брзим брзинама затварача. На пример, са амбијенталним светлом, чак и са отвором бленде широм отвореним (селективни фокус), слика се може правилно подекспонирати до 1/8000s, а Сирос вам и даље омогућава да подесите доминантне и креативне светлосне ефекте.
Све што је потребно за ово је РФС 2.2 предајник, који је доступан за Цанон, Фуји, Никон и Сони фотоапарате. Поред тога, ХС мора бити активиран на свим Сирос јединицама. Ово мења криву блица и гарантује, у комбинацији са РФС 2.2, исправну експозицију без ограничења по вашем избору брзине затварача.
Молимо Вас да прочитате упутство за употребу РФС 2.2 предајника да бисте сазнали више о оптималном коришћењу ХС функције.
Док радите у ХС режиму, са Сиросом можете користити само ниво снаге блица КСНУМКС до КСНУМКС.
9 . Посебне функције
9 .1 . Ресетовање (на фабричка подешавања)
Притисните тастер "тест" (5) за 4 секунде. Ово ресетује све функције на фабричка подешавања. Ресетовање се потврђује двоструким звучним сигналом.
9 .2 . "бронЦонтрол" апликација и ВиФи подешавања
Да бисте контролисали свој Сирос монолигхт, можете бесплатно преузети апликацију "бронЦонтрол". Да бисте пронашли апликацију, потражите "бронЦонтрол" у Апплеовом Апп Сторе-у или у Гоогле-овој Плаи продавници.
9 .2 .1 . Начини рада
9 .2 .1.1 . Рад у "приватном" режиму (фабричка подешавања)
Ако је ВиФи режим активиран на више од једног монолигхта, све ове јединице се аутоматски повезују са истом адресом студија како би формирале приватну мрежу. Паметни телефон или таблет мора бити повезан са овом мрежом како би га контролисао. Да бисте то користили, активирајте ВиФи функцију на паметном телефону или таблету. Ваш уређај ће тада аутоматски тражити доступне ВиФи мреже. Повежите свој паметни телефон или таблет са одговарајућом мрежом Брон-Студио. Лозинка везе је: бронЦонтрол. Сада покрените апликацију "бронЦонтрол" на свом уређају. Додајте одговарајући број студија под "додај нови студио" и повежите апликацију са овим студијем. За даља упутства о раду, молимо вас да користите функцију помоћи "?" у апликацији.
9 .2.1 .2 . Рад у режиму "предузећа"
Ако постоји ВиФи мрежа (рутер), јединица се може интегрисати у ову мрежу помоћу паметног телефона или таблета. Да бисте то постигли, у апликацији "бронЦонтрол", у подешавањима, идите на"Мрежна подешавања" и унесите поставке рутера у режиму "предузећа". Уверите се да су јединице подешене на исправну адресу студија. Сирос чува последњу врсту везе и покушава да се повеже са последњом мрежом следећи пут када почне.
9 .2.2 . Подешавања менија
Подешавања менија су дефинисана на следећи начин за: он / офф / синхронизација ( он / -- / си ).
9 .2 .3 . ВиФи дисплеј (3) на јединици
Симболи и њихови описи за Вифи дисплеј (3) на уређају су следећи.
9 .3 . Когнитивна светла
Када су изабрани различити канали лампе (зоне), спознаја светло на горњој површини јединице мења боју. Сврха овога је да се направи разлика између појединачних јединица када их контролише апликација "бронЦонтрол". Светло на уређају мења боју када се апликација активира на паметном телефону или таблету или када се притисне ротациони контролер на јединици; Мења се назад у плаву по напуштању менија.
Боје лампе канала су следеће.
10 . Информације и поруке о грешкама*
10 .1 . Акустични сигнали
Звучни сигнали су звучни сигнал или двоструки звучни сигнал.
10 .2 . Порука на екрану
Напомена : * Поруке о грешкама су увек такође означене црвеним светлом спознаје.
11 . Често постављана питања
11.1 . Промена Фласх цеви
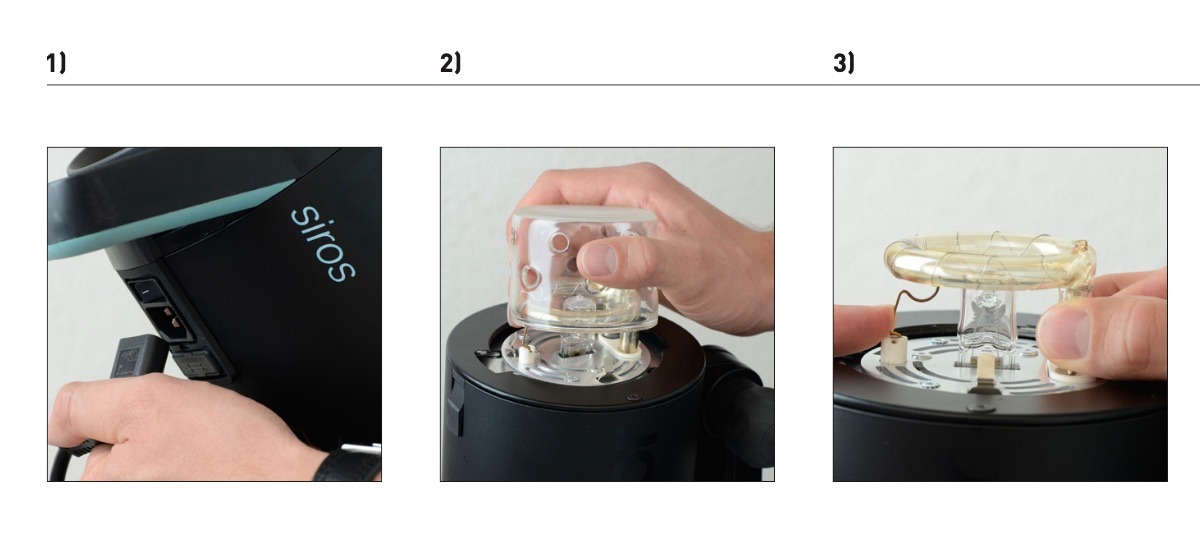
- Искључите мрежни кабл из јединице.
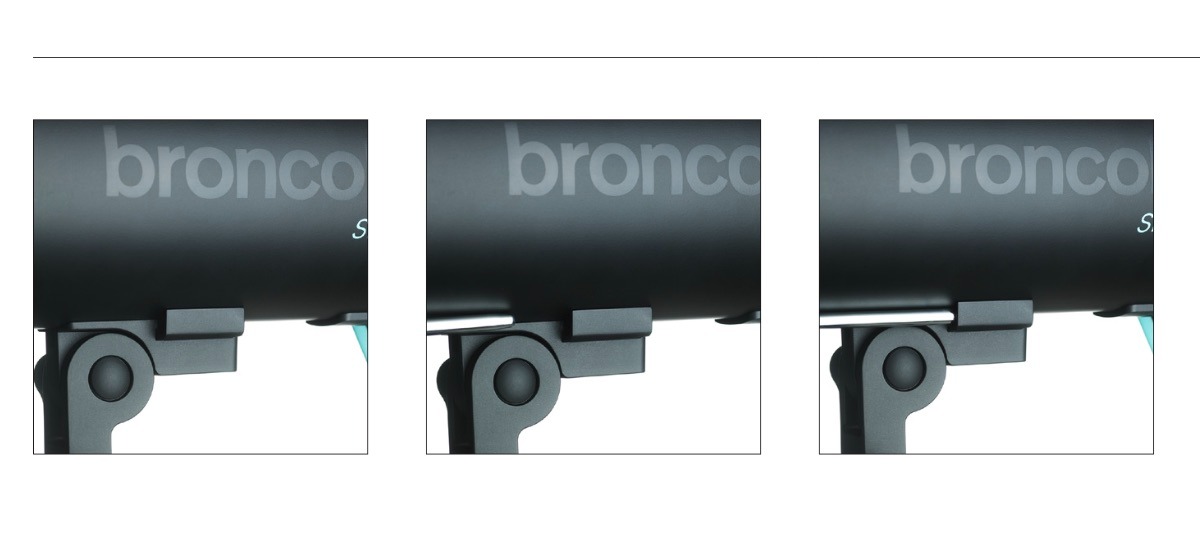
- Уклоните сигурносно стакло тако што ћете га извући из својих причврсних клипова.
- Притисните контактну опругу надоле и пажљиво извуците цев за бљесак.
11 .2 . Промена осигурача
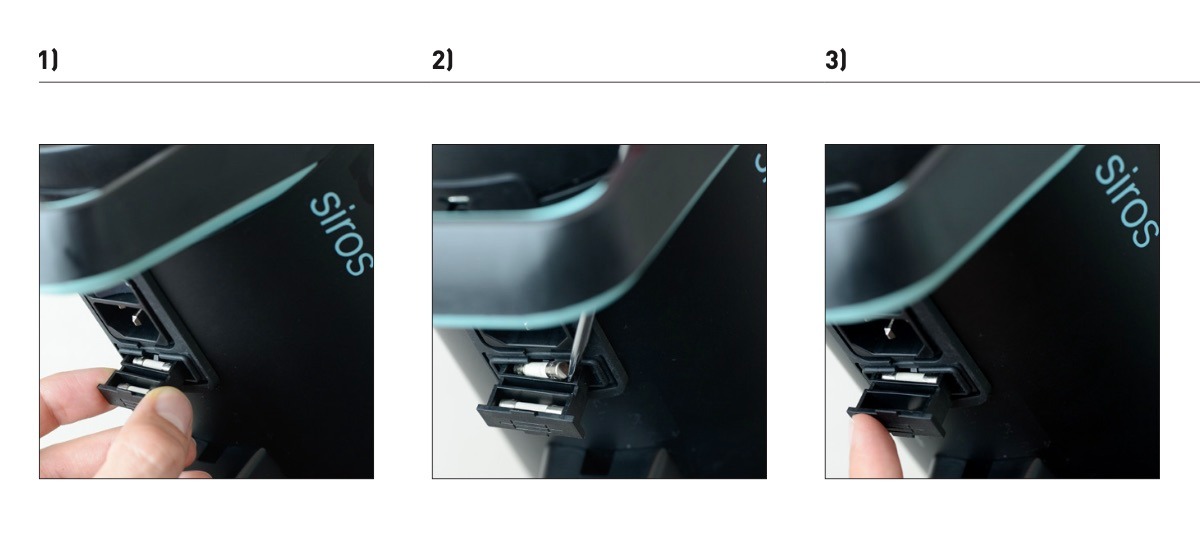
- Искључите мрежни кабл из јединице (види слику 1 горе). Отворите одељак са осигурачима испод јединице.
- Пажљиво извадите прегорели осигурач шиљастим предметом.
- Уметните резервни осигурач и поново затворите одељак са осигурачима
11 .3 . Промена светлости Схаперс
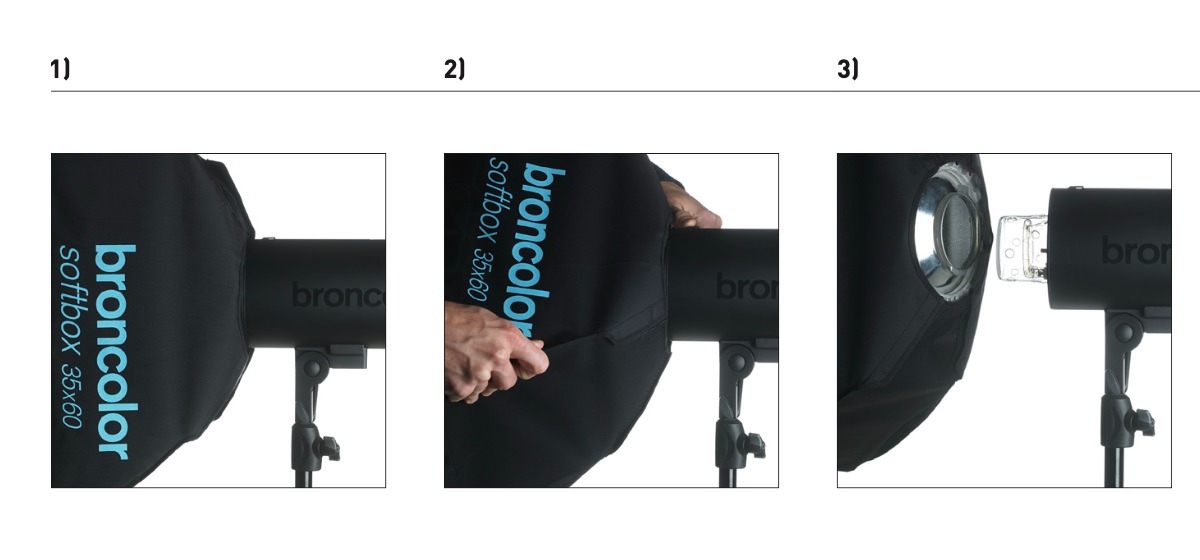
- Окрените светло схапер у оба смера до краја.
- Повуците отпуштање уназад и истовремено окрените обликовач светлости док се не ослободи бајонетног прикључка.
- Пажљиво уклоните обликовач светлости на предњу страну. Пазите да не оштетите сигурносно стакло.
11 .4 . Монтажа кишобран
Да бисте монтирали кишобран, монтирајте га у отвор који се налази испод јединице.
12 . Додатна опрема
Сирос је компатибилан са читавим асортиманом бронцолор светлосних обликоватеља.
Следеће ставке представљају посебно препоручену додатну опрему :
13 . Одржавање и поправке
Ваш бронцолор монолигхт је прецизан инструмент, способан да обезбеди године несметаног рада када се третира са одговарајућом пажњом. Међутим , уколико дође до квара, молимо вас да не покушавате да отворите уређај и поправите га сами. Чак и када је јединица искључена, и даље могу постојати опасни нивои напона унутар ње. Стога , за одржавање и поправке, увек пошаљите јединицу на сервис Бронцолор.
14 . Информације о заштити животне средине
На крају свог корисног века, овај производ се не може одлагати као нормалан кућни отпад. Уместо тога, мора се однети на сабирно место за рециклажу електричних и електронских уређаја. Материјали се могу рециклирати према њиховим ознакама. Поновном употребом, рециклажом или другим облицима коришћења старих апарата дајете важан допринос заштити наше животне средине.
Молимо вас да питате своје локалне власти или Бронцолор продајног партнера за одговарајуће место одлагања.
15 . Гаранција
Сви бронцолор напајање, лампе, монолигхтс и прибор су изграђени на високом стандарду квалитета. Бронцолор нуди двогодишњу фабричку гаранцију од датума куповине (за првог власника) на горе наведене бронцолор производе. Из ове гаранције искључене су фласх цеви, халогене сијалице, заштитне наочаре, каблови, батерије и текстил. Грешке настале услед непоштовања безбедносних упутстава, неправилног руковања, употребе прибора другог произвођача, неовлашћене интервенције или модификације искључене су из фабричке гаранције. Бронцолор /
16 . Обавештење за купце из Велике Британије
Овај уређај се може конфигурисати за повезивање на бежичну ЛАН мрежу. Конфигуришите овај производ за повезивање са обезбеђеном инфраструктуром. Немојте користити режим конфигурације за нормалан рад.
- Извештаји о безбедносним рањивостима: суппорт@бронцолор.свисс
- Време реакције: 30 дана
- Дефинисани период подршке у Великој Британији: 2 године након датума продаје, примењује се само на производе који се продају у Великој Британији (осим Северне Ирске) 29. априла 2024. године или након тога
- Име произвођача: Брон Електроник АГ
- Адреса произвођача: Хагматтстрассе 7, 4123 Аллсцхwил, Швајцарска
17 . Технички подаци


ПоверСхот&нбсп;Ребел&нбсп;серија


ПоверСхот&нбсп;ДСЛР&нбсп;серија


ЕОС &нбсп;М &нбсп;серија без&нбсп;огледала


ПоверСхот серија


Изблиза /&нбсп;Ручни

Цанон ЕОС Ребел серија нуди ДСЛР фотоапарате прилагођене почетницима са солидним квалитетом слике, интуитивним контролама и разноврсним функцијама. Идеални за љубитеље фотографије, ове камере пружају поуздан аутофокус, екране осетљиве на додир под различитим угловима и Фулл ХД или 4K видео снимање.
Везу
Резолуција (МП)
Резолуцију
Цанон ЕОС ДСЛР серија пружа висококвалитетне слике, брз аутофокус и свестраност, што га чини идеалним за фотографију и видео продукцију.
Везу
Резолуција (МП)
Резолуцију
Цанон ЕОС М серија без огледала комбинује компактан дизајн са перформансама сличним ДСЛР-у. Са изменљивим објективима, брзим аутофокусом и висококвалитетним сензорима слике, ове камере су одличне за путнике и креаторе садржаја који траже преносивост без жртвовања квалитета слике.
Везу
Резолуција (МП)
Резолуцију
Цанон ПоверСхот серија нуди компактне, усер-фриендли камере за повремене стрелце и ентузијасте. Са моделима у распону од једноставних поинт-анд-схоотс до напредних камера за зумирање, они пружају практичност, солидан квалитет слике и функције као што су стабилизација слике и 4K видео.
Везу
Резолуција (МП)
Резолуцију
Цанон крупни и ручни фотоапарати дизајнирани су за детаљну фотографију и видео запис изблиза. Компактни и једноставни за коришћење, нуде прецизан фокус, снимање високе резолуције и свестране макро могућности - савршене за влогирање, фотографију производа и креативне крупне планове.


